Access Your Raspberry Pi Remotely: SSH Setup with FRP (No Port Forwarding Required)
Set up your raspberry pi/ old laptop/ pc as a server and expose it to the internet for ssh access without port forwarding.
Introduction
Many of my personal and work projects require dedicated development and testing environments. We often containerize these projects and deploy them on EC2 instances. However, as our EC2 bills started to grow, we decided to take a cost-effective approach by migrating some of these projects to our on-premises server.
In this post, I’ll walk you through how we’re leveraging a Raspberry Pi as a server and exposing it to the internet for SSH access using FRP — a fast reverse proxy. The relay server costs as little as ~$3/month (e.g., an AWS t4g.nano), far cheaper than running a full EC2 dev instance.
Prerequisites
- Raspberry Pi/ Old laptop/ PC with Ubuntu installed
- Server with a static IP address (deployed on AWS/ GCP/ Azure/ Vultr/ DigitalOcean) to act as a relay server
Step 1: Spin up a Relay Server
First, we need to set up a relay server that will act as a bridge between our Raspberry Pi and the internet. You can use any cloud provider. In this example, we’ll use an AWS EC2 instance.
- Launch an EC2 instance with Ubuntu 20.04 AMI.
- Assign an Elastic IP to ensure a static IP address.
- SSH into the EC2 instance and install the FRP server.
sudo apt update
sudo apt install wget unzip openssh-server -y
wget https://github.com/fatedier/frp/releases/download/v0.61.1/frp_0.61.1_linux_amd64.tar.gz
tar -xvf frp_0.61.1_linux_amd64.tar.gz
cd frp_0.61.1_linux_amd64
sudo cp frps /usr/local/bin
cd
sudo rm -rf frp_0.61.1_linux_amd64
sudo rm frp_0.61.1_linux_amd64.tar.gz
- Create a configuration file for the FRP server.
sudo mkdir -p /etc/frp
sudo nano /etc/frp/frps.toml
- Add the following configuration to the file.
bindPort = 7000
auth.token = "your-secret-token"
Important: Set
auth.tokento a strong secret. Any client that knows this token can tunnel through your relay server.
- Open ports 6000 and 7000 on the relay server before starting FRP. Update the security group in the AWS console:
- Type: Custom TCP Rule, Protocol: TCP, Port Range: 6000, Source:
0.0.0.0/0(or restrict to your IP) - Type: Custom TCP Rule, Protocol: TCP, Port Range: 7000, Source:
0.0.0.0/0(or restrict to Raspberry Pi’s IP)
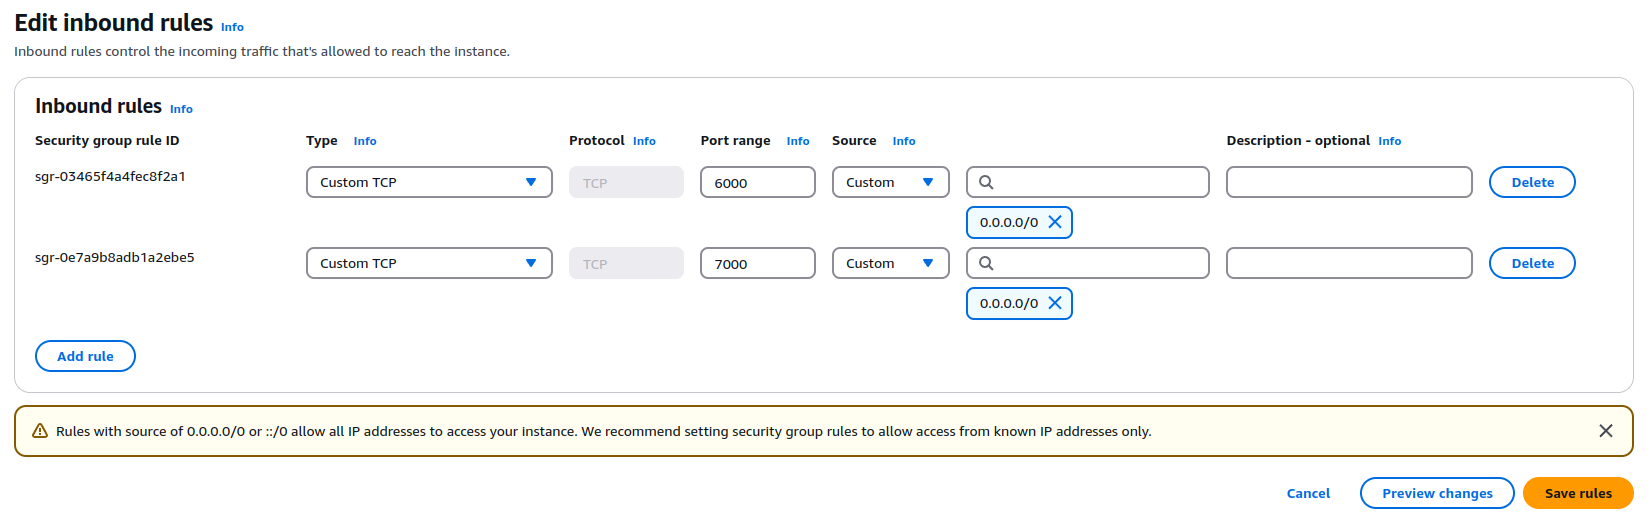 Inbound Security Rules
If you’re using UFW on the relay server, also run:
- Type: Custom TCP Rule, Protocol: TCP, Port Range: 6000, Source:
sudo ufw allow 6000/tcp
sudo ufw allow 7000/tcp
- Start the FRP server.
frps -c /etc/frp/frps.toml
- Set up FRP server as a systemd service so it starts automatically on reboot.
sudo nano /etc/systemd/system/frps.service
Add the following:
[Unit]
Description=FRP Server
After=network.target

[Service]
ExecStart=/usr/local/bin/frps -c /etc/frp/frps.toml
Restart=always

[Install]
WantedBy=multi-user.target
Then enable and start it:
sudo systemctl daemon-reload
sudo systemctl enable frps
sudo systemctl start frps
Step 2: Set up FRP on Raspberry Pi
Next, we need to install the FRP client on the Raspberry Pi to establish a connection with the relay server.
Architecture note: Raspberry Pi uses ARM — download the correct binary for your device:
- Pi 3 (32-bit):
frp_0.61.1_linux_arm_v7.tar.gz- Pi 4 / Pi 5 (64-bit):
frp_0.61.1_linux_arm64.tar.gz- x86 PC/laptop:
frp_0.61.1_linux_amd64.tar.gz
- SSH into the Raspberry Pi and install the FRP client (replace the filename with the correct one for your architecture).
sudo apt update
sudo apt install wget unzip openssh-server -y
wget https://github.com/fatedier/frp/releases/download/v0.61.1/frp_0.61.1_linux_arm64.tar.gz
tar -xvf frp_0.61.1_linux_arm64.tar.gz
cd frp_0.61.1_linux_arm64
sudo cp frpc /usr/local/bin
cd
sudo rm -rf frp_0.61.1_linux_arm64
sudo rm frp_0.61.1_linux_arm64.tar.gz
- Create a configuration file for the FRP client.
sudo mkdir -p /etc/frp
sudo nano /etc/frp/frpc.toml
- Add the following configuration to the file.
serverAddr = "x.x.x.x"
serverPort = 7000
auth.token = "your-secret-token"

[[proxies]]
name = "ssh"
type = "tcp"
localIP = "127.0.0.1"
localPort = 22
remotePort = 6000
Replace x.x.x.x with the Elastic IP/ DNS name of the relay server, and use the same auth.token you set on the server.
- Start the FRP client.
frpc -c /etc/frp/frpc.toml
 Connection Success Client To Relay Server
- Set up FRP client as a systemd service so it reconnects automatically on reboot.
sudo nano /etc/systemd/system/frpc.service
Add the following:
[Unit]
Description=FRP Client
After=network.target

[Service]
ExecStart=/usr/local/bin/frpc -c /etc/frp/frpc.toml
Restart=always

[Install]
WantedBy=multi-user.target
Then enable and start it:
sudo systemctl daemon-reload
sudo systemctl enable frpc
sudo systemctl start frpc
Step 3: SSH into the Raspberry Pi
Now that everything is set up, you can SSH into the Raspberry Pi from anywhere using the relay server.
ssh -p 6000 [email protected]
Replace pi with the username of your Raspberry Pi and x.x.x.x with the Elastic IP of the relay server.
And that’s it! You now have a Raspberry Pi accessible from anywhere on the internet without port forwarding.
Troubleshooting
- Wrong architecture binary: If
frpcorfrpsexits immediately, you likely downloaded the wrong binary. Check withuname -mand download the matching one. - Connection refused on port 6000/7000: Verify the AWS security group inbound rules and UFW rules are configured correctly.
- Auth token mismatch: Ensure
auth.tokenis identical in bothfrps.tomlandfrpc.toml. - SSH permission denied: Use SSH keys instead of passwords. See the DigitalOcean SSH key guide for setup instructions.
- FRP doesn’t start after reboot: Run
sudo systemctl status frpc(orfrps) to check the service logs.
FAQs
Can I use a different cloud provider for the relay server?
Yes, you can use any cloud provider that allows you to spin up a server with a static IP address. The steps may vary slightly depending on the provider, but the overall setup remains the same.
Is this setup secure?
Encryption is off by default in FRP. You can enable it by adding the following to both the server and client configuration files:
transport.useEncryption = true
You should also always set auth.token and use SSH keys for authentication rather than passwords.
Why not use a VPN instead?
While VPNs are a secure way to access your devices remotely, they can be complex to set up and maintain. FRP provides a simple and lightweight solution for exposing your Raspberry Pi to the internet without the need for port forwarding.
Why not ngrok?
Ngrok is a popular tool for exposing local servers to the internet. However, it has limitations on the free tier, such as limited connections and tunnel duration. FRP, on the other hand, is open-source and allows you to set up your own relay server with no such limitations.
Where can I learn more about FRP?
You can find more information about FRP on the official GitHub repository.
Conclusion
In this post, we talked about how to set up a Raspberry Pi as a server and expose it to the internet using FRP. This setup is a cost-effective way to access your Raspberry Pi remotely without port forwarding — just make sure to enable encryption and set an auth token for a hardened setup. In the next post, I’ll show you how we are using Cloudflare Tunnel to expose Docker containers to the internet.